So the hubby and I have been really into eating totally organic, whole foods that are super healthy without all of the processed stuff... Or well starting to at least. We still have some stuff in the pantry we are purging out by eating it (don't judge lol). We aren't going totally radical and leaving out our occasional snacks of chips or ice cream but we're really trying to change the way we eat. I don't know how any of you do things but if you have ever gone into a regular grocery store (Kroger, Aldi, Meijer, etc) you will know produce is expensive... Now tack on the word organic and you get the price doubled. Same goes for your Whole Foods or Trader Joe's. We live very comfortably but we do not have it in our budget to purchase all organic, natural foods like we would love to right now. So we're starting slow lol the way we figured would be the best is to start with our fruits and veges, as vegetarians those are the foods we eat the most... Plus they are the healthiest anyways.
I read about Bountiful Baskets here and have been looking for a company or co-op that does what they do
since I will not drive to Louisville or Lexington, KY just to pick up
some fruits or veggies... That's two hours away and by the time I were
to drive there, I might as well have just driven to my grocery store and
bought the stuff myself lol I have scoured the earth (well really just Google) for a place like Bountiful Basket in my area since unfortunately they do not do my area of Cincinnati, OH. I wanted to let you know I have FINALLY (you may be puzzled at why I capitalized finally as to add emphasis as if I have mentioned it a lot before, I haven't on here but if you ask the Mr., he will agree I have been beating it to death) found one in my area.
Where I Found Them:
So Friday mid-afternoon as the hubby and I were getting ready to go out on a company outing for some competition racing, he got a call that he needed to get to the office for a meeting with a new client they had at the new Mercedes-Benz Dealership. The racing was about an hour away from the house and only 25-30 from the office so we had planned on driving together to save gas. Well we dropped the girls off with my brothers for the evening and left early. I waited at the office and just did some work on a case that I had been handed earlier for my internship while I waited for him to return from the meeting. He works in a smaller building suite where the two owners (a father and son) have an office there... It's a very family oriented company that we love! The owner of the company's daughter had this place deliver her order to the office. (Yes, I said it, they deliver!) I heard a few grumbles about her order being delivered there and that she will need to come pick it up because they won't be home late because of the racing and dinner. I looked out the window and what do I see? I see a delivery truck for this place and since it was fresh in my mind I got nosy and asked his wife (the receptionist) a few questions that she gladly answered the best she could. I was super motivated to look into it more because their daughter is like the epitome of physical health, strength and wellness (did I mention she is in her mid to late-30's, looks barely 30 and runs marathons and does triathlons?!)... Something I would love to be! I know that story was a little long but as you can see it tied in with it... Plus I talk a lot meaning I type out a lot because it is what is on my brain lol
About the Company:
The place is called Green B.E.A.N. Delivery. For $35 you can get a small bin of fruits and veggies delivered to your door once a week or bi-monthly. The price goes up by $7 for each size, $42 for a medium and $49 for a large, respectively. They do all organic, mostly locally grown produce (as long as they are in season in your area). If it is not local, they will tell you where it is coming from. They also have a HUGE selection of local milk, eggs, cheese, bread, vegetarian foods, cookies, crackers, cupcakes, meats, beans, spices, sauces, dressings... Pretty much anything local and/or organic that you can have added onto your order for an additional charge as well. When you sign up you have to make a standing order, which is basically a default order of what you want. You have to cancel your order or make changes to the items in your order by Monday at noon the week your order is supposed to arrive. They will send you an e-mail reminder that your order is going to be delivered that week and give you a link to your account so you can change it. Green B.E.A.N. allows you to change what comes in your bin, so if you don't like beets or broccoli or pineapples or whatever, you can choose from a long list of produce available and change the order to your liking. You can also add various things each time your order so you can have the same things each order or switch it up if you want. You do not have to be home to get the order, they will leave the bin in front of your door in a shaded area (if available). The bin they put the items in is insulated and has reflective material in it to keep it cool, they also put plenty of ice packs inside to keep your order fresh and in good condition. The bin, liner and ice packs need to be put on your porch for pick-up when you get your next delivery in order to prevent being charged for the items.
As if I didn't explain how awesome this place is already, I have another point. I am all about service and giving, I love being the Lord's hands and feet to bless those in need around me. Well when you return your bins, you have the opportunity to put non-perishable food items in your bins and they will deliver them to the local food pantry in your area. They also in the past couple years have matched the amount of canned foods people have donated in November and December with pounds of produce to local food banks and pantries. I love that they do this! They have also teamed up with a place in my county and have provided over 50 families with the blessing of fresh produce when they would normally have not had the chance to have good nutrition or fresh produce due to circumstances. They are constantly giving back and donating ten-fold to the communities they deliver to! What a blessing that is!!
Another perk to this company is their customer service that everyone has raved about. I have not had any experience with it yet but everyone has said they are great. If there is a product missing or not of good quality (which out of the 40+ reviews I've read, has only happened to 2 people one time) they will either deliver the item if it is a feasible thing or credit your next order for the item(s) if you contact them by the next day. That is fantastic... I couldn't tell you how many times I have gone to the grocery store and I didn't look closely enough or it was on it's last leg and my produce has gone bad the next day but the grocery store won't do anything about it. I'm glad they will do something and be nice about it too!! (side note: we found some veggie burgers in the vegetarian/organic section of Kroger the other day while picking up some Tofurkey and all four patties were covered in mold, Ryan took it to the customer service desk and all they said was "Well you can go pick out another one, you didn't have to get one covered in mold."... All he did was bring it to their attention and told them it might be wise to check the rest of the burgers before someone else discovers them too. We also walked over to the produce section to pick out some peaches and plums for lunch the next day when we went to build furniture here and they had gnats and flies all over their stuff... Lack of care for quality by the big guys).
All in all, my review of them is great. I will let you know if I was able to get my order in and receive it this week, I'm excited to see what my bin will contain and how I will be able to use all of our delicious goodies in some new recipes this week!!
Note: I am only giving an honest review of what I have experienced so far. I have not been lucky enough to receive a free sample bin from them that give out to big time bloggers or to be paid to review them at all. I do not make money off of this blog for anything. I have done thorough research and have signed up for my own account.
Sunday, September 29, 2013
Monday, September 23, 2013
My weekend and the present reveal
Now that it is Monday and we have settled into our regular lives and out of fantasy-anniversary-no-kids-world hahaha!
Seriously though, we had a BLAST! We had such a packed weekend!


I put both of these on here because my flash showed the color really well but it also has some shine that changed the look of it. Ya.... This thing is HUGE and he drew it by hand from a picture we took when we were dating many years ago... It was the first picture we had ever taken together and just to show how in-sync and perfect for each other we are, we took the picture with the intent to smile but then both (unannounced) decided to make a crazy, tongue-sticking out face instead LOL

 They are semi-crappy quality but I didn't want to bring my camera in once I found out it was pouring and would continue to do so all night. This was the best I could do in the pouring rain! We were so close :-)


 I love the panoramic shots! The first one was before the game started, when they were warming up. The second was at night during the game. I discovered that day that my phone could take panoramic shots, I got really excited!!
Sunday:
Woke up decently early (not intentionally) and got some breakfast at the Waffle House down the street from our hotel since our Continental Breakfast was VERY skim (there were like 3 muffins and coffee left... did I mention it was like 7:30am?!?!). We got ready for the day then went to the Easton Shopping Centre... That place was HUGE! We got a few things for the house and just had fun looking at all the different shops, some we have in Cincinnati, some we don't. Oh, and while we were out shopping that day, Elizabeth broke her pinky at my mom's house while riding a scooter. Luckily my mom and Micah are good at dealing with that stuff so we weren't panicking or anything... It wasn't a bad break, just at the base of her pinky. She has a splint on it now but will be going back to a hand specialist this week to probably be put in a cast or something. After we went shopping, we went back to the hotel to get ready for the show. We went to the Shadowbox Theater and saw Spamalot.... A show that Ryan has been wanting to see live for years. The unfortunate thing about their set-up was that we had to spend the night of our anniversary sitting with other people and we didn't even get first pick of the seats at the table so we were literally sitting on opposite sides of the table to be able to see and so the other people who were behind us could see (we had to turn our chairs around). Also, the people we got sat with ate with their mouths open... GROSS! Oh well, the show was hilarious and the food was delish (not many vegetarian options but the options we did have were good). We topped it off with a Shadowbox Mountain which was three brownies with three scoops of ice cream, a giant pile of whipped cream, warm chocolate and caramel sauces with a cherry on top... YUM!
 This was the only shot I got on Sunday. I kept forgetting to take pictures. He is such a goofball!
Of course like goofs we forgot our top layer of our wedding cake at home so we will be eating that either this week or weekend at some point. It was an awesome weekend and we loved not even thinking about anything at home or having kids (except for the broken finger part or seeing something they would like while we were shopping). We left our cares two hours away for thee whole days! It was so nice to be able to focus on Ryan and our love instead of the million things we always have going on for a while. We also loved Columbus and pondered the many things we could do and where we could live if I were to get accepted to OSU for law school... I loved it!
The girls were really excited to see us when we picked them up! They kept screaming "I can't believe you've been married for a whole year!!" haha they're cute :)
I had been so relaxed that I had almost forgotten that I had class this evening. That is a good thing I guess. Ryan of course didn't forget he had work... He got a lovely reminder call when Kev called to tell him there was a bunch of crap that happened while he was gone. Ryan is such a trooper but I know that he has such better, less stressful things coming in his near future!!
Seriously though, we had a BLAST! We had such a packed weekend!
Presents:
So in my previous post I had shown how I made my present, well we exchanged presents on Friday before we dropped the girls off at my mom's house. I have posted photos below of the finished products of my work and a photo of what Ryan made me (which was freaking sweet!)


I put both of these on here because my flash showed the color really well but it also has some shine that changed the look of it. Ya.... This thing is HUGE and he drew it by hand from a picture we took when we were dating many years ago... It was the first picture we had ever taken together and just to show how in-sync and perfect for each other we are, we took the picture with the intent to smile but then both (unannounced) decided to make a crazy, tongue-sticking out face instead LOL
Weezer:
Oh boy the concert was a hoot! It was raining when we got there so we brought our umbrellas like sensible people since the concert was outside. We go to scan our tickets and they tell us, well everyone, we can't bring in our umbrellas so we either needed to check them at coat check or take them back to our cars. The closest location was inside the casino (which was still pretty far into the casino) at coat check so Ryan ran them inside. We got about 10 people from the stage so we had a great place! There was a great opening act from Cincy called the DAAP Girls. I couldn't quite understand their lyrics because their instruments (keyboard, 2 guitars, bass, drums, sax and trumpet) were wayyyyy louder than their mic volumes but I will be looking them up this week to hear some of their stuff. Anywho, the rain slowed down and eventually stopped by the time those guys were done so I went into the porta-potty and rung my shirt out over the toilet and was dry again. Weezer finally came out on stage and after one song, it started to pour again... The harder/louder/faster the song, the more intense the rain.... We walked out of the venue when the concert was over DRENCHED from head to toe. Everyone walked into the casino to either get their umbrellas, gamble or get their car from valet. The line for the valet/coat check was super long and we were freezing cold. Luckily there was a Starbucks next to where we were in line so I stayed in line while Ryan got us some hot chocolate and cookies (those were an unrequested bonus!). By the time he got through the Starbucks line, I had just gotten our umbrellas and we got in our car and left. We stopped and got a movie on the way home and went to bed after the movie was done.

Saturday:
Saturday, after we packed for the weekend and ate a little something, we went to a place called the Mad Potter in Mediera. What an awesome time that was! We painted a serving tray together and will be getting it back next week after it's been glazed and fired. Ryan was really excited when the lady that owns the place was very impressed with the platter because it is what she does for a living, so he knew he did well when she was floored by it lol we went for a nice lunch at Noodles & Co. in Kenwood (one of our favorite places) then headed up to Columbus. We were able to check into our hotel and be able to have time to change before going to the Columbus Crew Game. Ryan was excited that he was able to get us a free parking spot outside of the stadium (parking was $12!!). We also got there in time to get a FREE Crew drawstring bag, which was another bonus! It was Ryan's first Crew game and they WON! It was 3-0 versus the Chicago Fire :)


Sunday:
Woke up decently early (not intentionally) and got some breakfast at the Waffle House down the street from our hotel since our Continental Breakfast was VERY skim (there were like 3 muffins and coffee left... did I mention it was like 7:30am?!?!). We got ready for the day then went to the Easton Shopping Centre... That place was HUGE! We got a few things for the house and just had fun looking at all the different shops, some we have in Cincinnati, some we don't. Oh, and while we were out shopping that day, Elizabeth broke her pinky at my mom's house while riding a scooter. Luckily my mom and Micah are good at dealing with that stuff so we weren't panicking or anything... It wasn't a bad break, just at the base of her pinky. She has a splint on it now but will be going back to a hand specialist this week to probably be put in a cast or something. After we went shopping, we went back to the hotel to get ready for the show. We went to the Shadowbox Theater and saw Spamalot.... A show that Ryan has been wanting to see live for years. The unfortunate thing about their set-up was that we had to spend the night of our anniversary sitting with other people and we didn't even get first pick of the seats at the table so we were literally sitting on opposite sides of the table to be able to see and so the other people who were behind us could see (we had to turn our chairs around). Also, the people we got sat with ate with their mouths open... GROSS! Oh well, the show was hilarious and the food was delish (not many vegetarian options but the options we did have were good). We topped it off with a Shadowbox Mountain which was three brownies with three scoops of ice cream, a giant pile of whipped cream, warm chocolate and caramel sauces with a cherry on top... YUM!

Of course like goofs we forgot our top layer of our wedding cake at home so we will be eating that either this week or weekend at some point. It was an awesome weekend and we loved not even thinking about anything at home or having kids (except for the broken finger part or seeing something they would like while we were shopping). We left our cares two hours away for thee whole days! It was so nice to be able to focus on Ryan and our love instead of the million things we always have going on for a while. We also loved Columbus and pondered the many things we could do and where we could live if I were to get accepted to OSU for law school... I loved it!
The girls were really excited to see us when we picked them up! They kept screaming "I can't believe you've been married for a whole year!!" haha they're cute :)
I had been so relaxed that I had almost forgotten that I had class this evening. That is a good thing I guess. Ryan of course didn't forget he had work... He got a lovely reminder call when Kev called to tell him there was a bunch of crap that happened while he was gone. Ryan is such a trooper but I know that he has such better, less stressful things coming in his near future!!
Tuesday, September 17, 2013
One Year Anniversary, Inexpensive Presents
Well folks, you read the title correctly. It's my one year wedding anniversary in a few days! I CANNOT believe time has gone so quickly! It honestly feels like we just got sealed in the temple a few months ago, time just goes by so quickly!
Last weekend the girls made us an anniversary dinner and dessert. They have been making a plan for our anniversary since we got back from our honeymoon lol they're sweet! I let them decide what they wanted to make, as long as it was easier because they don't have much advanced cooking experience. They decided on baked cod, corn on the cobb and redskin mashed potatoes with cheesecake for dessert. Talk about gourmet! I took them shopping and they picked everything out themselves and then put all of the groceries away. On Sunday they got started cooking and I helped them a very tiny bit with showing them how to slice a lemon and reaching some spices or carrying the heavy pots filled with water for their potatoes and corn. All in all, it was delicious! Doesn't it just look delicious?!?

We have a PACKED weekend and we're both so excited for our mini-vaca this weekend, it is much needed!
Saturday: Breakfast at home, Mad Potter to paint ourselves a serving platter or bowl, roadtrip to Columbus, check into our hotel then head over to the Crew Stadium for the game!
Sunday: breakfast at hotel, exploring Columbus for a little while, go to hotel and get all dolled up, head to the Shadowbox for some dinner and to watch Spamalot. We're staying the night in Columbus again and then we'll be heading back home in the morning after breakfast.
We are really excited!! We had a plan to do glassblowing but that fell through because they apparently don't do the deal we were getting on Saturday's and we had already purchased our non-refundable tickets to Spamalot.... I love Ryan and all but I was not about to pay $250/person to do glassblowing when I found a deal for both of us to do it for $120. We decided to change it, although it took some time and more research, we came upon Mad Potter which will be just as good, if not better because we can be artistic and show off our personalities in something that we'll bring out everytime we have a party (which is a lot)!
Side Note: I could paint pottery all day, everyday! I would LOVE to own a place like Mad Potter or Let's Go Doodlin' or one of those places that does the Wine and Canvas nights in the future... It would be awesome!
So I made him a canvas portrait of sorts. I painted an 11x13 canvas with our blue wedding color that has a bit of a pearl/metallic shimmer to it. I then went onto Microsoft Publisher and typed out the lyrics of our wedding song in a very pretty, cursive font. I then laid out a heart shape on top of the lyrics, I chose hearts that were 3x3 in size so that they could cover enough of the lyrics in each heart. I made tow hearts in red with our initials and our wedding date inside of them. I printed them on white cardstock and cut out the hearts inside the lines because I didn't want the black outline on them. I will be gluing those hearts onto pieces of foam and gluing that onto the canvas. I'm excited about how it's going to turn out... The colors really pop together!
The next thing I made was a passport and airline tickets to twelve different foreign destinations. I got this idea from here. I printed all of these things on cardstock... It just made it seem stronger to me. With this passport, I will be putting a picture of him in the photo section and gluing the little stamps on the pages. I also made airline tickets to each destination... One for each month! It will end up costing more than just the price of paper but each date is in the house and will cost almost nothing (minus price of food but that would incorporated into our food budget). Our first destination in Cairo, Egypt in October because we will be going over to Ryan's aunt's house for an Egyptian themed Halloween party... Which will cost us nothing except for gas money but will be a fun night without kids. I made an itinerary so that he can have a little schedule to know which dates to save for me for our dates based on the airline tickets. A few of the dates we can do while the kids are here, just send them to the other room or do it after they go to bed. We're going to hopefully get sitters for the dates but if not, they're all at home so it's no biggie if they are here.
For this gift you will need to get your significant other (links to free printable items included):
1- A Passport
2- The Itinerary
3- Stamps for their Passport
4- The Card to tie it all together and so they have a clue to what you're doing
5- The Airline Tickets (this was my favorite part!)
For my countries I used: Caribbean, China, Egypt, England, France, Germany, Greece, India, Ireland, Italy, Mexico and Russia. I am blessed that we live 10 minutes from a Jungle Jim's International Market which sells like everything from every country which will make our international dates super easy to pull off! Here's an example of how I did my tickets. I used a photo editing software to combine four tickets onto one page so that they could be a little smaller than the 8x10 size they come in... I also got to save paper in the process :)

Don't they look like the real thing?!? I was SOOO impressed by this!
I decided to recreate the card for my own spin on things because the one they had didn't quite tickle my fancy. I've attached my version below:

The site recommends cooking something for dinner from that country and setting the scene a little (ex: towel in the shape of an animal, togas, blue water and a beach ball in the bathtub, etc.) depending on where the journey takes you. Then watch a movie that is set or based on that country (ex: Aladdin, The King and I, My Big Fat Greek Wedding, etc.). It is such a simple and fun idea but I think he will love it!
So there you have it, two things made my me for my hubby that cost me almost nothing. I had to buy cardstock, canvas, paint and will have to purchase special foods once a month but my total was under $10.
Last weekend the girls made us an anniversary dinner and dessert. They have been making a plan for our anniversary since we got back from our honeymoon lol they're sweet! I let them decide what they wanted to make, as long as it was easier because they don't have much advanced cooking experience. They decided on baked cod, corn on the cobb and redskin mashed potatoes with cheesecake for dessert. Talk about gourmet! I took them shopping and they picked everything out themselves and then put all of the groceries away. On Sunday they got started cooking and I helped them a very tiny bit with showing them how to slice a lemon and reaching some spices or carrying the heavy pots filled with water for their potatoes and corn. All in all, it was delicious! Doesn't it just look delicious?!?

We have a PACKED weekend and we're both so excited for our mini-vaca this weekend, it is much needed!
The Itinerary:
Friday: dinner at home, Weezer Concert at The Shoe then back home for the eveningSaturday: Breakfast at home, Mad Potter to paint ourselves a serving platter or bowl, roadtrip to Columbus, check into our hotel then head over to the Crew Stadium for the game!
Sunday: breakfast at hotel, exploring Columbus for a little while, go to hotel and get all dolled up, head to the Shadowbox for some dinner and to watch Spamalot. We're staying the night in Columbus again and then we'll be heading back home in the morning after breakfast.
We are really excited!! We had a plan to do glassblowing but that fell through because they apparently don't do the deal we were getting on Saturday's and we had already purchased our non-refundable tickets to Spamalot.... I love Ryan and all but I was not about to pay $250/person to do glassblowing when I found a deal for both of us to do it for $120. We decided to change it, although it took some time and more research, we came upon Mad Potter which will be just as good, if not better because we can be artistic and show off our personalities in something that we'll bring out everytime we have a party (which is a lot)!
Side Note: I could paint pottery all day, everyday! I would LOVE to own a place like Mad Potter or Let's Go Doodlin' or one of those places that does the Wine and Canvas nights in the future... It would be awesome!
The Gift:
So the first anniversary is traditionally paper, modern is clock. We chose to go with the traditional gift and get really creative with it. We wanted to spend as little as possible on the gift so that we could have more for the mini-vaca. I have no idea what Ryan has done, he says I will love it and that he has created it himself and it is cheesy... I'm sure I'll love it. So of course, with an artsy husband, the pressure is on because paper can mean so many things... I am creative but I can't draw to save my life. So I scoured my Pinterest Boards and google to help me think of some things to do. Well I ended up with a combination of things that I think he will love.So I made him a canvas portrait of sorts. I painted an 11x13 canvas with our blue wedding color that has a bit of a pearl/metallic shimmer to it. I then went onto Microsoft Publisher and typed out the lyrics of our wedding song in a very pretty, cursive font. I then laid out a heart shape on top of the lyrics, I chose hearts that were 3x3 in size so that they could cover enough of the lyrics in each heart. I made tow hearts in red with our initials and our wedding date inside of them. I printed them on white cardstock and cut out the hearts inside the lines because I didn't want the black outline on them. I will be gluing those hearts onto pieces of foam and gluing that onto the canvas. I'm excited about how it's going to turn out... The colors really pop together!
The next thing I made was a passport and airline tickets to twelve different foreign destinations. I got this idea from here. I printed all of these things on cardstock... It just made it seem stronger to me. With this passport, I will be putting a picture of him in the photo section and gluing the little stamps on the pages. I also made airline tickets to each destination... One for each month! It will end up costing more than just the price of paper but each date is in the house and will cost almost nothing (minus price of food but that would incorporated into our food budget). Our first destination in Cairo, Egypt in October because we will be going over to Ryan's aunt's house for an Egyptian themed Halloween party... Which will cost us nothing except for gas money but will be a fun night without kids. I made an itinerary so that he can have a little schedule to know which dates to save for me for our dates based on the airline tickets. A few of the dates we can do while the kids are here, just send them to the other room or do it after they go to bed. We're going to hopefully get sitters for the dates but if not, they're all at home so it's no biggie if they are here.
For this gift you will need to get your significant other (links to free printable items included):
1- A Passport
2- The Itinerary
3- Stamps for their Passport
4- The Card to tie it all together and so they have a clue to what you're doing
5- The Airline Tickets (this was my favorite part!)
For my countries I used: Caribbean, China, Egypt, England, France, Germany, Greece, India, Ireland, Italy, Mexico and Russia. I am blessed that we live 10 minutes from a Jungle Jim's International Market which sells like everything from every country which will make our international dates super easy to pull off! Here's an example of how I did my tickets. I used a photo editing software to combine four tickets onto one page so that they could be a little smaller than the 8x10 size they come in... I also got to save paper in the process :)

Don't they look like the real thing?!? I was SOOO impressed by this!
I decided to recreate the card for my own spin on things because the one they had didn't quite tickle my fancy. I've attached my version below:

The site recommends cooking something for dinner from that country and setting the scene a little (ex: towel in the shape of an animal, togas, blue water and a beach ball in the bathtub, etc.) depending on where the journey takes you. Then watch a movie that is set or based on that country (ex: Aladdin, The King and I, My Big Fat Greek Wedding, etc.). It is such a simple and fun idea but I think he will love it!
So there you have it, two things made my me for my hubby that cost me almost nothing. I had to buy cardstock, canvas, paint and will have to purchase special foods once a month but my total was under $10.
Thursday, September 12, 2013
What I Want To Be When I Grow Up....
Well followers of my lovely blog, it is official. I have finally figured out what I want to be when I grow up!! I have been really struggling with this for a long time because I have so many different interests that it is hard to say, "Okay I am going to choose one interest and be happy with doing that until I retire." I couldn't do it. Not only could I not narrow it down but I am AWFUL at making decisions, even simple ones like what restaurant we are going to eat at if we go out. I just struggle internally with it. This was no different. I weighed my options before I went to college, then changed my mind and my major, halfway through my degree. Then, I changed it again but kept the same major. I have been challenged by 3 out of my 5 professors this semester to do my research, think deeply and if needed or if I do it, pray about it. So I have spent the past three weeks doing just that, praying, pondering, researching and researching and weighing my options. I have not received an answer to my prayers yet but have received comfort and an ease of making my plans and decisions, as well as total support from my husband, the girls and the rest of my family.
I am going to be a prosecutor, preferably in Ohio and maybe even Clermont County (because they are the highest paid and have some awesome people working in the county). This means that after Ryan finishes school, I will start applying for law school. I am wanting to go to Brigham Young University's Law School out in Provo, Utah which means we will be moving away from Ohio for three years. I will take my bar in Ohio so that I can practice law here. I researched various law schools and this one is not only in the top 50 for law schools in the United States but it is also the least expensive for me. Being a member of the Church of Jesus Christ of Latter Day Saints allows me to go there (if accepted) for the cost of $40,000 (including books and such) versus about $80,000 (including books) at the University of Cincinnati or $90,000 (including books) at Ohio State University and I would still have to move the family if I went to OSU. I would say the financial aspect is a HUGE part of my decision. Yes, we would be moving to Utah for three years, I would save money from tuition and make my potential student debt lower. Which brings me to my second point that helped make my decision. While Ryan is in school, he is still planning on working and we will be able to use that money for our living expenses like we do now. I will also be getting a job once I graduate and will work while he is in school. We have been able to live very comfortably off of his salary with no issues on paying bills or lack of activities that we do as a family. The plan is to save the money from my job until/if Ryan needs to stop working during school and apply that towards our moving expenses, my tuition and any bills we might have while out there if Ryan or I can't find a job immediately (which we would hopefully have squared away before we made the move). We're wanting Ryan to be certified as a teacher in Utah so he can get a job out there pretty quickly. As for the house, we're thinking of renting it while we're gone so we have something to come back to when I'm done with school. I think we could VERY easily rent out our house in this area... We have a large house that would be rented for not even close to the regular price of a 5 bedroom- 3 bath house in the awesome school district with everything updated. Our last part of the plan is to have our first child before we move out there (we're thinking 2 years from now)... I've heard having a newborn baby during 1L is awful so our hope is to have a baby that is like 1-2 years old when we move and then during 2L we can try for another one and just have as many kids as we want but avoid giving birth during 1L like the plague LOL
We have everything all planned out and our hope is that everything goes according to plan when the time comes. It will be a big move for us and definitely a scary time but it will be well worth it in the end! It would open so many doors for us!! I would love to practice law and for us to get to a point where Ryan can stay home full time and work on his art and comic books, all day, everyday because that is where his heart is. Until then, we'll be moving along the way we're going and work hard to get to where we need to be!
Just keep us in your prayers throughout this time!
Have a happy day!
Tuesday, September 10, 2013
Car Trash Bag
Now that I have bored you with my organization story, I will hopefully excite some of you with a little How-To!
If you didn't already know, I love to sew. I love to create. I love to craft. I love to do artistic things with my hands. I always have and I always will. Today I will show you how to make a lovely (and less expensive) car trash can. I don't know about you but I very highly dislike when my car gets messy! Especially the backseat because the girls are old enough to pick up after themselves, they just were programmed for 8 years to just make a mess of everything and no one will care. Well, that is not how things work in my house... Not at all! I know people create messes in general and if any of you have been in my house you will know that it is not always 100% clean all of the time but we try! We get so busy and caught up that the dishes might pile up or we might have some shoes laying around. The car is different. I feel that if you bring a Barbie in, a Barbie should come out. You eat in the car? The wrappers or peels or dishes should come out. Plain and simple. So I decided enough was enough! I wanted no excuses for the garbage, I just wanted it off the seat and the floor and not to roll up to my feet when I stop or go down a steel hill lol I also wanted Ryan's car to be clean. He has the tendency to just throw his bottles or soda cans on the floor with the intention of throwing them away when he gets home but when you work 2nd/3rd shift, you kind of just want to come home and crawl into bed without a thought of the trash being thrown away... I don't blame him but I also didn't want to have to step on cans or make us late because we needed to clean out his car before we went somewhere so we could actually put out feet down without a constant crunch.
Well I decided first to go look at a few stores to see how much they were... Uhm they were ridiculous! These people were requesting anywhere from $10-20 for a trashcan that hooked onto the back of my seat. HA! So while at Walmart I walked on over to the fabric section and scanned their $1 and $2/yard section. I found a fabric I loved and one that I thought Ryan would love as well. I went over to their table cloth section and got a vinyl tablecloth because the oilcloth they were selling in the fabric section was about $6-$10 per yard and a vinyl tablecloth is basically the same thing. All-in-all for the materials to create two trash bags per car and have plenty of material left-over (I was able to create a purse, one set of scripture covers and a sewing machine cover with the scraps from just the flowery material), they all four cost a total of $5... If you have followed along at all, you would say to yourself, "That is a steal Megan!! If you were to buy four trash bags from the store that weren't nearly as pretty you would be paying $40-80! And you wouldn't have a cute purse, scripture covers or a sewing machine cover to match!" That right there folks is why I do things myself when and if I can! You can do it to with just the materials listed below and about an hour of your time. It is very simple to create these yourself :-)
So I will stop rambling on and give you what you came for, the how-to section.


If you didn't already know, I love to sew. I love to create. I love to craft. I love to do artistic things with my hands. I always have and I always will. Today I will show you how to make a lovely (and less expensive) car trash can. I don't know about you but I very highly dislike when my car gets messy! Especially the backseat because the girls are old enough to pick up after themselves, they just were programmed for 8 years to just make a mess of everything and no one will care. Well, that is not how things work in my house... Not at all! I know people create messes in general and if any of you have been in my house you will know that it is not always 100% clean all of the time but we try! We get so busy and caught up that the dishes might pile up or we might have some shoes laying around. The car is different. I feel that if you bring a Barbie in, a Barbie should come out. You eat in the car? The wrappers or peels or dishes should come out. Plain and simple. So I decided enough was enough! I wanted no excuses for the garbage, I just wanted it off the seat and the floor and not to roll up to my feet when I stop or go down a steel hill lol I also wanted Ryan's car to be clean. He has the tendency to just throw his bottles or soda cans on the floor with the intention of throwing them away when he gets home but when you work 2nd/3rd shift, you kind of just want to come home and crawl into bed without a thought of the trash being thrown away... I don't blame him but I also didn't want to have to step on cans or make us late because we needed to clean out his car before we went somewhere so we could actually put out feet down without a constant crunch.
My solution: a trashcan for the backseat!
Well I decided first to go look at a few stores to see how much they were... Uhm they were ridiculous! These people were requesting anywhere from $10-20 for a trashcan that hooked onto the back of my seat. HA! So while at Walmart I walked on over to the fabric section and scanned their $1 and $2/yard section. I found a fabric I loved and one that I thought Ryan would love as well. I went over to their table cloth section and got a vinyl tablecloth because the oilcloth they were selling in the fabric section was about $6-$10 per yard and a vinyl tablecloth is basically the same thing. All-in-all for the materials to create two trash bags per car and have plenty of material left-over (I was able to create a purse, one set of scripture covers and a sewing machine cover with the scraps from just the flowery material), they all four cost a total of $5... If you have followed along at all, you would say to yourself, "That is a steal Megan!! If you were to buy four trash bags from the store that weren't nearly as pretty you would be paying $40-80! And you wouldn't have a cute purse, scripture covers or a sewing machine cover to match!" That right there folks is why I do things myself when and if I can! You can do it to with just the materials listed below and about an hour of your time. It is very simple to create these yourself :-)
So I will stop rambling on and give you what you came for, the how-to section.
Materials needed:
- 1/2 yard of your favorite fabric.
- 1 vinyl tablecloth OR 1/2 yard of oil cloth
- 1 pair of scissors, preferably sewing/fabric scissors.... they do a better job of cutting fabric without tearing it up
- 1 fabric marker of some sort. I chose a fabric pencil but a fabric marker or chalk will do. Regular washable marker, pencil, crayon, or chalk will do as well.
- Sewing machine
- Thread of your choice
- Pins
- Perfect fold line card, like this one (optional)

Lovely aren't they?
The pink flowery one is mine and the blue is Ryan's.
Directions:


- Cut four squares that measure 16 inches by 16 inches. You will need two from your fabric and two from your tablecloth. Then cut two strips from your fabric measuring 2 inches by 16 inches (can by longer if you have a wider headrest). It should look like this, but with only one set:

- Start with your strips of of fabric. Fold them in a 1/4 of an inch and iron it down. Then fold in half and iron flat. Like so:

- Sew the strap, along the edge, about 1/8 inch from the edge. No need to turn it inside out, that just makes things very complicated. I like the finished look of this plus I don't have to sew the edges more than once. Just tuck the frays and you're done :-) Like this:

- Next, sew the squares of your pretty fabric, right sides in with a 1/4 inch seam allowance on ONLY three sides. Then do the same for your tablecloth squares. I didn't take a picture of this, but hopefully you know what this means.
- Like a goof I did not take a picture of the following step, which can be
tricky for those who have never done it before, so I will try to
describe it the best I can. We are creating the foundation for your box
bottom on this trash can, aka gussets (you can google pictures if you
don't know what that is or the following directions don't make sense to
you). Take three fingers (pointer, middle and ring) and put together.
Stick those three fingers into the corner of the bag sideways so that it
opens up the corner, now flatten that. Your corner should now make the
side of your back fold back and is no longer the flat square it was
before. You should have a pretty triangle. Now make an even line across
that triangle about two inches up from the point. Pin and sew along that
line. Repeat on the other side. Now I trim the piece about 1/4 to a 1/2
inch from the line but some people don't like to. It is all a matter of
preference.
- Once that has been completed, pin and sew your straps onto the pretty fabric (the should still be wrong side out). I
sewed mine about two inches from the edge... You can change that to be
whatever you would like. Pin both straps on the same side of the bag,
but do not sew them together as they will be tied around your headrest
or wherever you decided to put it. Again, leave a 1/4 inch seam
allowance when you do this.
- This is where it can get tricky but I have a few pictures to show what I mean. Take the square of your pretty fabric that you just sewed and turn it right sides out. Now take the square from your table cloth with and keep it wrong side out. Now put your pretty fabric inside of your tablecloth, lining up the side and bottom seams. Pin together so they don't get messed up and make sure your straps have been flattened on not tangled up in the pinning... That would get very messy and painful later on! Do it like so:

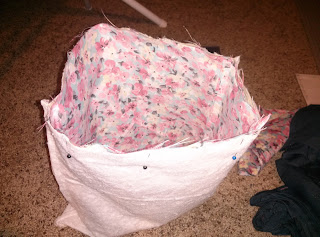
- Sew the top that you just pinned, with a 1/4 inch seam allowance. Leave about three to five inches open (I marked mine with a lovely blue line so I remembered to stop). This will com in handy later when we flip the bag to be right side out. Like so:


- Now you will want to flip the bag inside out. You do this by putting your fingers into the hole you left yourself on the top of the bag, grab the pretty fabric and pull it all the way through the hole. Make sure you get it fairly flattened and the corners pulled out well.
- Now tuck the tablecloth into the pretty fabric... It should be smooth side of the tablecloth is on the inside of the bag and the pretty, right side is on the outside of the bag. Like this:
- Now sew the very top of the bag, making sure to tuck in the ends where the bag was open. I used an 1/8 inch seam allowance for that. The final product should look something like this:
- Now tie this pretty thing around your headrest bars and you are good to go! The inside of these are completely washable, which is a total bonus! I love that if the girls get something sticky in them, I can just rinse or wipe it off and it comes off easy. They can also be thrown into the washer, I am not sure about the dryer though so I just let mine air dry in the car overnight which works out great! And in case you are wondering, yes the straps are strong enough to hold onto the headrest and the trash without falling or ripping.If you have any questions feel free to send me a message and I'll be glad to help!!
Happy Crafting Ladies and Gents!


Monday, September 9, 2013
Craft Room Organization... Still In Progress
So to start off, we bought a house in January that was a foreclosed, totally out-of-date home and we worked every single day (on top of school, work and the girls) to make it up-to-date and close to what we would like for it to look like (mostly). Well it has plain colors and lots of wood, we are kind of sick of looking at it everyday. Tan or very light gray (almost white) walls, dark and light woods and tan carpet. We are artistic, creative and colorful people (for peat's sake, my hair is blonde with blue and pink streaks in it!) so we are adding LOTS of color to the house.... Ok so now I'm off topic but I will get back to the color part in a later post!
One of the challenges of having a home and being busy is making and keeping things organized! We had a hard time trying to organize when we first moved in because we had the girls' birthday party the weekend after we moved in, Ryan had been forced to take on the task of three people at work (while getting paid the exact same amount... talk about a stressful 6 months!) and I was working on school work... So over the summer I have been working in-between homework for me and taking the girls everywhere, to start to organize our house before we start painting and reconstructing... So far I have done three rooms :-)
The first room I will talk about and discuss my method for organization. Pre-warning: this room is not all the way complete but it is WAYYYY better than it was before and we can find things. It got a little worse because we started the girls doing homeschooling so some of the boxes from that are in there, not put away and also we just got a new TV for our bedroom that is being housed in there until we can organize our bedroom (which is a feat we have never finished since we've lived together... the bedroom to us comes last on the list of organizing/unpacking. Ok, so here it goes (complete with pictures, please don't judge me!)
So when we moved in, we chose this lovely bedroom on the front of the house to be our craft room because we have A LOT of craft stuff so we thought it would only be right to dedicate a whole room to it! It has a large window in the room that faces the street and gets lots of light so we can save electricity when we are in there a lot completing various project. I can also watch the girls playing outside with their friends while I am working on various crafts... It was perfect! So I labeled our boxes for that room and the movers put the boxes there. They sat there and I moved through boxes and just grabbed what I needed from the boxes and left it at that. Well I finally got fed up with it and worked for a whole day to get it done... Well it goes mostly done LOL and I didn't even spend more than $10 on the whole organization process!
Here are a few before pictures that were taken before I started to work on the room.


My first task was the closet. There were scraps of carpet from when we had the carpet installed, our cake tower that we built for our wedding in pieces, bags full of Christmas stuff (mainly wrappers and ornament boxes that were garbage), some of my quilting and bookbinding materials, my sewing machine box, a tattered box that I've had since I was in high school with my various fabric and scraps and accessories and a few things that don't even belong in the craft room! I forgot to take a before picture, trust me, it's for the better! But here is the after picture, it makes me happy :-)
 Yup, that's it, that is how much it has been reduced to! The lovely hard blue box you see has my fabric in it, I have my quilting/bookbinding materials in that recycled paper box and the blue/tan polka dot container has my "adult" crafting stuff that the girls need to ask before they can use... Things like paint, glitter, stronger glues than Elmer's, etc. This closet cost me $1 to organize.... The materials I already had and the blue box was a gift from a wonderful woman named Martha when we were moving, the $1 was for the blue/tan organizing box from the Dollar Tree.
Next, we'll talk about the girls' corner of the room. If any of you have kids, you'll know that they can't seem to keep anything organized or put things in their place (especially if they don't know where it should go). This was true for this corner. They just kind of threw things over there, never putting them where they should kind of be, always losing things and breaking them because they would step on something they just tossed into that corner. On the left is the before and on the right is the after. It's is soooo different AND they have kept it this way since I have done it!


On the left you see the before. Atrocious, I know! On the right is the after picture... MUCH better!! The girls can now see where everything is before they remove it and know where to put everything back when they are done with it!
Now I will show you my little paper organizer that I have changed a little to make it my scrapbook corner. My sister put this stuff away before but I don't blame her at all for it not being organized or where/how I want it. She was helping and did a great job at helping me unpack before the girls' birthday party! You'll have to look at all of the before/working pictures to see how this thing looked before!

As you can see it looks wayyyy better than it did before! I will be adding some more to it because I have a few boxes with scrapbooks (both finished and still working on them) as well as pictures and fun little things for scrapbooking but it will be put away in an organized manner!
Ok and here is where it is now. It still needs some work but I couldn't stay up any longer to work on it... I was already up until 4am working on this room haha I will be finishing it soon though, it NEEDS to get done!


As you can see, it is not all the way done BUT it is much better than what it was :-)
Some of the organization bags/boxes and white wood units are things I already had. The only thing I needed to buy were the blue/tan polka dot boxes. They come in many shapes and sizes and are found at Dollar Tree for $1 each.... Which is a STEAL for these containers. They are just as strong as any other fabric box you would buy from Target, Walmart, etc. but they cost way less! I love that they have a removable hard bottom piece to add stability. I used one of the hard bottoms in a wider box to separate our glue from our rulers using binder clips and the bottom being folded in half. All in all I spent a maximum of $10 on this room, which is great for me because I dislike spending money on things if I don't have to!
I would highly recommend browsing your local dollar store (not a dollar general or family dollar though, they have various prices on their items so everything isn't a dollar but they might have some good deals on stuff too) and find containers you like to organize with... Most of the time they have different colors, materials and are actually good quality.
I will be purchasing a pegboard from Lowe's, some zipties and some cute colored plastic cups from the Dollar Tree next month and installing it in the craft room to add some extra organization in that room for the little things. I will post some pictures of that when it happens.
Happy Organization and Crafting Ladies and Gents :-)
One of the challenges of having a home and being busy is making and keeping things organized! We had a hard time trying to organize when we first moved in because we had the girls' birthday party the weekend after we moved in, Ryan had been forced to take on the task of three people at work (while getting paid the exact same amount... talk about a stressful 6 months!) and I was working on school work... So over the summer I have been working in-between homework for me and taking the girls everywhere, to start to organize our house before we start painting and reconstructing... So far I have done three rooms :-)
The first room I will talk about and discuss my method for organization. Pre-warning: this room is not all the way complete but it is WAYYYY better than it was before and we can find things. It got a little worse because we started the girls doing homeschooling so some of the boxes from that are in there, not put away and also we just got a new TV for our bedroom that is being housed in there until we can organize our bedroom (which is a feat we have never finished since we've lived together... the bedroom to us comes last on the list of organizing/unpacking. Ok, so here it goes (complete with pictures, please don't judge me!)
So when we moved in, we chose this lovely bedroom on the front of the house to be our craft room because we have A LOT of craft stuff so we thought it would only be right to dedicate a whole room to it! It has a large window in the room that faces the street and gets lots of light so we can save electricity when we are in there a lot completing various project. I can also watch the girls playing outside with their friends while I am working on various crafts... It was perfect! So I labeled our boxes for that room and the movers put the boxes there. They sat there and I moved through boxes and just grabbed what I needed from the boxes and left it at that. Well I finally got fed up with it and worked for a whole day to get it done... Well it goes mostly done LOL and I didn't even spend more than $10 on the whole organization process!
Here are a few before pictures that were taken before I started to work on the room.


My first task was the closet. There were scraps of carpet from when we had the carpet installed, our cake tower that we built for our wedding in pieces, bags full of Christmas stuff (mainly wrappers and ornament boxes that were garbage), some of my quilting and bookbinding materials, my sewing machine box, a tattered box that I've had since I was in high school with my various fabric and scraps and accessories and a few things that don't even belong in the craft room! I forgot to take a before picture, trust me, it's for the better! But here is the after picture, it makes me happy :-)

Next, we'll talk about the girls' corner of the room. If any of you have kids, you'll know that they can't seem to keep anything organized or put things in their place (especially if they don't know where it should go). This was true for this corner. They just kind of threw things over there, never putting them where they should kind of be, always losing things and breaking them because they would step on something they just tossed into that corner. On the left is the before and on the right is the after. It's is soooo different AND they have kept it this way since I have done it!


On the left you see the before. Atrocious, I know! On the right is the after picture... MUCH better!! The girls can now see where everything is before they remove it and know where to put everything back when they are done with it!
Now I will show you my little paper organizer that I have changed a little to make it my scrapbook corner. My sister put this stuff away before but I don't blame her at all for it not being organized or where/how I want it. She was helping and did a great job at helping me unpack before the girls' birthday party! You'll have to look at all of the before/working pictures to see how this thing looked before!

As you can see it looks wayyyy better than it did before! I will be adding some more to it because I have a few boxes with scrapbooks (both finished and still working on them) as well as pictures and fun little things for scrapbooking but it will be put away in an organized manner!
Ok and here is where it is now. It still needs some work but I couldn't stay up any longer to work on it... I was already up until 4am working on this room haha I will be finishing it soon though, it NEEDS to get done!


As you can see, it is not all the way done BUT it is much better than what it was :-)
Some of the organization bags/boxes and white wood units are things I already had. The only thing I needed to buy were the blue/tan polka dot boxes. They come in many shapes and sizes and are found at Dollar Tree for $1 each.... Which is a STEAL for these containers. They are just as strong as any other fabric box you would buy from Target, Walmart, etc. but they cost way less! I love that they have a removable hard bottom piece to add stability. I used one of the hard bottoms in a wider box to separate our glue from our rulers using binder clips and the bottom being folded in half. All in all I spent a maximum of $10 on this room, which is great for me because I dislike spending money on things if I don't have to!
I would highly recommend browsing your local dollar store (not a dollar general or family dollar though, they have various prices on their items so everything isn't a dollar but they might have some good deals on stuff too) and find containers you like to organize with... Most of the time they have different colors, materials and are actually good quality.
I will be purchasing a pegboard from Lowe's, some zipties and some cute colored plastic cups from the Dollar Tree next month and installing it in the craft room to add some extra organization in that room for the little things. I will post some pictures of that when it happens.
Happy Organization and Crafting Ladies and Gents :-)
Subscribe to:
Comments (Atom)