If you didn't already know, I love to sew. I love to create. I love to craft. I love to do artistic things with my hands. I always have and I always will. Today I will show you how to make a lovely (and less expensive) car trash can. I don't know about you but I very highly dislike when my car gets messy! Especially the backseat because the girls are old enough to pick up after themselves, they just were programmed for 8 years to just make a mess of everything and no one will care. Well, that is not how things work in my house... Not at all! I know people create messes in general and if any of you have been in my house you will know that it is not always 100% clean all of the time but we try! We get so busy and caught up that the dishes might pile up or we might have some shoes laying around. The car is different. I feel that if you bring a Barbie in, a Barbie should come out. You eat in the car? The wrappers or peels or dishes should come out. Plain and simple. So I decided enough was enough! I wanted no excuses for the garbage, I just wanted it off the seat and the floor and not to roll up to my feet when I stop or go down a steel hill lol I also wanted Ryan's car to be clean. He has the tendency to just throw his bottles or soda cans on the floor with the intention of throwing them away when he gets home but when you work 2nd/3rd shift, you kind of just want to come home and crawl into bed without a thought of the trash being thrown away... I don't blame him but I also didn't want to have to step on cans or make us late because we needed to clean out his car before we went somewhere so we could actually put out feet down without a constant crunch.
My solution: a trashcan for the backseat!
Well I decided first to go look at a few stores to see how much they were... Uhm they were ridiculous! These people were requesting anywhere from $10-20 for a trashcan that hooked onto the back of my seat. HA! So while at Walmart I walked on over to the fabric section and scanned their $1 and $2/yard section. I found a fabric I loved and one that I thought Ryan would love as well. I went over to their table cloth section and got a vinyl tablecloth because the oilcloth they were selling in the fabric section was about $6-$10 per yard and a vinyl tablecloth is basically the same thing. All-in-all for the materials to create two trash bags per car and have plenty of material left-over (I was able to create a purse, one set of scripture covers and a sewing machine cover with the scraps from just the flowery material), they all four cost a total of $5... If you have followed along at all, you would say to yourself, "That is a steal Megan!! If you were to buy four trash bags from the store that weren't nearly as pretty you would be paying $40-80! And you wouldn't have a cute purse, scripture covers or a sewing machine cover to match!" That right there folks is why I do things myself when and if I can! You can do it to with just the materials listed below and about an hour of your time. It is very simple to create these yourself :-)
So I will stop rambling on and give you what you came for, the how-to section.
Materials needed:
- 1/2 yard of your favorite fabric.
- 1 vinyl tablecloth OR 1/2 yard of oil cloth
- 1 pair of scissors, preferably sewing/fabric scissors.... they do a better job of cutting fabric without tearing it up
- 1 fabric marker of some sort. I chose a fabric pencil but a fabric marker or chalk will do. Regular washable marker, pencil, crayon, or chalk will do as well.
- Sewing machine
- Thread of your choice
- Pins
- Perfect fold line card, like this one (optional)

Lovely aren't they?
The pink flowery one is mine and the blue is Ryan's.
Directions:


- Cut four squares that measure 16 inches by 16 inches. You will need two from your fabric and two from your tablecloth. Then cut two strips from your fabric measuring 2 inches by 16 inches (can by longer if you have a wider headrest). It should look like this, but with only one set:

- Start with your strips of of fabric. Fold them in a 1/4 of an inch and iron it down. Then fold in half and iron flat. Like so:

- Sew the strap, along the edge, about 1/8 inch from the edge. No need to turn it inside out, that just makes things very complicated. I like the finished look of this plus I don't have to sew the edges more than once. Just tuck the frays and you're done :-) Like this:

- Next, sew the squares of your pretty fabric, right sides in with a 1/4 inch seam allowance on ONLY three sides. Then do the same for your tablecloth squares. I didn't take a picture of this, but hopefully you know what this means.
- Like a goof I did not take a picture of the following step, which can be
tricky for those who have never done it before, so I will try to
describe it the best I can. We are creating the foundation for your box
bottom on this trash can, aka gussets (you can google pictures if you
don't know what that is or the following directions don't make sense to
you). Take three fingers (pointer, middle and ring) and put together.
Stick those three fingers into the corner of the bag sideways so that it
opens up the corner, now flatten that. Your corner should now make the
side of your back fold back and is no longer the flat square it was
before. You should have a pretty triangle. Now make an even line across
that triangle about two inches up from the point. Pin and sew along that
line. Repeat on the other side. Now I trim the piece about 1/4 to a 1/2
inch from the line but some people don't like to. It is all a matter of
preference.
- Once that has been completed, pin and sew your straps onto the pretty fabric (the should still be wrong side out). I
sewed mine about two inches from the edge... You can change that to be
whatever you would like. Pin both straps on the same side of the bag,
but do not sew them together as they will be tied around your headrest
or wherever you decided to put it. Again, leave a 1/4 inch seam
allowance when you do this.
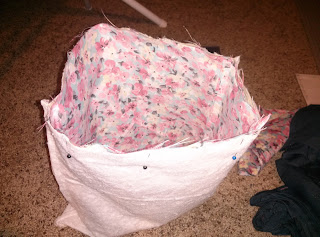
- This is where it can get tricky but I have a few pictures to show what I mean. Take the square of your pretty fabric that you just sewed and turn it right sides out. Now take the square from your table cloth with and keep it wrong side out. Now put your pretty fabric inside of your tablecloth, lining up the side and bottom seams. Pin together so they don't get messed up and make sure your straps have been flattened on not tangled up in the pinning... That would get very messy and painful later on! Do it like so:

- Sew the top that you just pinned, with a 1/4 inch seam allowance. Leave about three to five inches open (I marked mine with a lovely blue line so I remembered to stop). This will com in handy later when we flip the bag to be right side out. Like so:


- Now you will want to flip the bag inside out. You do this by putting your fingers into the hole you left yourself on the top of the bag, grab the pretty fabric and pull it all the way through the hole. Make sure you get it fairly flattened and the corners pulled out well.
- Now tuck the tablecloth into the pretty fabric... It should be smooth side of the tablecloth is on the inside of the bag and the pretty, right side is on the outside of the bag. Like this:

- Now sew the very top of the bag, making sure to tuck in the ends where the bag was open. I used an 1/8 inch seam allowance for that. The final product should look something like this:

- Now tie this pretty thing around your headrest bars and you are good to go! The inside of these are completely washable, which is a total bonus! I love that if the girls get something sticky in them, I can just rinse or wipe it off and it comes off easy. They can also be thrown into the washer, I am not sure about the dryer though so I just let mine air dry in the car overnight which works out great! And in case you are wondering, yes the straps are strong enough to hold onto the headrest and the trash without falling or ripping.If you have any questions feel free to send me a message and I'll be glad to help!!
Happy Crafting Ladies and Gents!


No comments:
Post a Comment